Decalcomanie su vetro.

Volete personalizzare/decorare dei contenitori in vetro,
con le decalcomanie ad acqua sarà un gioco!
Ciò di cui necessitate è :
  1. il contenitore (per decal singole è preferibile una forma cilindrica)
  2. Una stampante a getto di inchiostro o laser
  3. La carta decal idonea alla vostra stampante (seleziona carta da qui)
  4. Delle forbici od una taglierina
  5. Per chi usa stampa inkjet sarà necessario anche del fissativo trasparente.
Qui di seguito vi descrivo una procedura base utilizzabile sia con laser che con inkjet, unica differenza nei passi della guida è che con carta per stampa laser potrete saltare tutto il passaggio del fissativo spray:

Le seguenti istruzioni sono applicabili ad ambedue i tipi di carta.(clear & white INKJET)--- x la stampa laser non si ha bisogno di fissativo e quindi le fasi di questa guida nella quale se ne parla possono essere eluse.

Preparate il vostro lavoro grafico su pc.
Dimensionate ed impaginate a vostra preferenza
scegliendo la risoluzione idonea al vostro lavoro.
I fogli suppurtano risoluzione di stampa fino 2880 dpi.

Fate delle prove se non siete pratici, per l'impaginazione,
con dei fogli comuni e qualità bozza, tanto per vedere
se i margini delle foto \ immagini loghi siano corretti.

Quando siete sicuri stampate sul foglio decal su lato lucido.

Lasciate asciugare qualche minuto i fogli stampati.

Adesso dobbiamo fissare i colori di stampa poichè questi sono idrosolubili
e visto che per spellicolare la decal dobbiamo metterla in acqua
il processo di fissaggio è obbligatorio.

Per fissare i colori usiamo una comune bomboletta di spray trasparente lucido
vendute comunemente in ferramenta.In genere hanno dicitura :
SMALTO SINTETICO ACRILICO A RAPIDA ESSICAZIONE
-non ci sono per il momento preferenze di marca-

Per eseguire un lavoro pulito e corretto:

tenete il foglio in piano-mai con pendenza anche se minima,
lavorate e spruzzate in luogo idoneo ben areato e privo di polveri o pelurie,
accorgimento utile può essere dopo la stampa, passare sul foglio delicatamente
un panno acchiappapolvere antistatico-(li vendono nei negozi per la pulizia della casa).

procediamo con lo spruzzare il fissativo a mano leggera
distanza circa 30cm, il nostro foglio deve diventare omogeneamente bagnato di fissativo,(NON ESAGERATEe!!)
in controluce sembrarà completamente bagnato;
anche la minima zona non copertà correttamente può causare lo scioglimento del colore in essa.

Lasciamo asciugare

In genere questi fissativi asciugano in 15 min.
Io consiglio anche di attendere di più, a seconda dell'uso che se ne fà
possiamo prepararli in serie, e magari il giorno dopo avere tutti i fogli pronti e ben asciutti.

Credo sia buona norma non lasciare i fogli già fissati fermi per troppo tempo.
teniamo sempre in ogni caso i nostri fogli in luoghi asciutti, e mai con i lati lucidi
sovrapposti.

Il foglio è pronto, se sono più immagini o loghi sulla stampata dobbiamo ritagliarli,forbici o bisturi da carta,

una volta ritagliati ci occorre una bacinella e dell'acqua
mettiamo la carta in acqua.................

dopo circa 50 sec. il film della decal si separa dalla carta,
alcuni preferiscono prendere solo il film,
altri recuperano anche il sottofondo cartaceo per aiutarsi
nel far scivolare la decal sull'oggetto,
quì tutto dipende dalla pratica e dalla grandezza delle decal
lascio a voi appunto , la pratica.

Io ho notato che inumidendo l'oggetto sul quale devo posare la decal
questa scivolerà più facimente e sarà + agevolmente  posizionata.

decorare le saponette con le decal ad acqua

Picture of Dirty Soap
Everyone can use a bar of soap as a present so why not make your own bars extra special with some nudity? Spread the love!
 
Remove these adsRemove these ads by Signing Up

Step 1: Find images and print them onto decal paper.


Picture of Find images and print them onto decal paper.
The images you will have to find on your own, but as for the decal paper, you just get some from here. A ten-pack of the white should be good enough for about 80 bars of soap.

Get some bars of soap that have a flat face and measure to see what your work area is. Resize and crop your image to fit.

When you get the transfer paper, just put in in your inkjet printer and print it out.

Step 2: Spray some clear coat


Picture of Spray some clear coat
Apply 2-3 coats of some acrylic clear coat from a spray can and wait 60-90 minutes for it to dry.

Step 3: Trim to size


Picture of Trim to size
Cut out the picture. If you're feeling lucky, try to round the corners.

Step 4: Dunk in water


Picture of Dunk in water
Drop the decal into a glass of water for about 45 seconds. The backing will become loose and the decal will come off easily.

Step 5: Apply decal to soap


Picture of Apply decal to soap
If you're in a rush and have steady hands you can apply the decal onto a dry bar of soap.

If you want to be able to have some leeway and be able to reposition the decal, wet the soap a little bit first.

Apply the decal onto the soap and press out the air bubbles.

Step 6: Give the gift of love and happiness


Picture of Give the gift of love and happiness
Tie it up with a bow, wrap it in some fancy paper, or simply toss it to your roommate and shout "merry freakin' holidays!"

Customize the images to your friends if you want or just mix them up and when your friends call to thank you you can try to figure out which one they got.

Here's to closing out the year with class and style.

personalizzare una chitarra con le decal ad acqua

Step 1: What I started with. . . .

Ok, so what he got given, basically, was a sad, neglected orchestra size classical acoustic, unknown brand. Was missing a couple strings, missing the knob off of one of the tuners, the machine heads were kinda mucky (and cheap anyways), the neck had a backwards bow, dried fretboard, and with some finish issues. Not BAD, in fact, great size for him, the finish issues didn't affect the sound, and hey, it was FREE! So, with the help of an online auction site my quest to fix it up began.
This is kind of what I started with, I didn't think to take a picture before adding a pick guard but you get the idea. (It didn't have one, no biggie, but I thought it might be a good thing to add.)

Step 2: Assessing the cracks.

It had 6 cracks in the finish, probably from being in a storage unit, or from temperature changes, who knows. But even though they didn't affect the playability I started thinking of ways to cover them up, but needed a way that would not affect the sound. Also, since this was a free guitar, and for a beginning player who is 9, it really was not worth it to me to completely strip the finish (it's polyurethane so that would have been a pain in the rear anyways!) and refinish. Or take it to a luthier or anything like that.

Step 3: Devising a plan

So, after much, much research online I came up with "waterslide" decals. If you ever did models you would know them as those really, really thin decals that you soak in water and then the decal slides off of the paper backing and when it dries it is stuck on the item you slid it on.
They're not completely permanent so I had to think of a way to make them so also.

Since I needed decals that would work for my specific needs, so I decided to design my own. I taped paper to the guitar so I could draw them to cover the cracks.
The way the cracks were kind of made me think of creatures or something crawling around the guitar so I "went with that" and the creatures became dragons, and so the rough sketching took place.

Step 4: Completing the sketching.

Kind of self explanatory, got the dragons sketched out in a way that made me happy and also got my son excited.

Step 5: Coloring


I let my sons both pick and agree on the colors to make the dragons. Then colored them in, and touched up and finished the drawings till I was happy with them.

Step 6: Creating the decals


Next step was to copy the drawings on to ink jet water-slide decal paper. This was then coated with Krylon Acrylic Crystal clear coat and allowed to dry overnight.

Step 7: Applying to the guitar


I then sanded down the poly coat for two reasons. 1)And the most important, so that the Nitrocellulose coats I would be adding on top of the decals would have a better surface to "grab" to, and 2) since I knew I would be adding coats then the less already on the guitar the better. (This is why this picture looks all dull and flat.)

I applied the decals and then let them dry for 24 hours.

Step 8: Finishing it up.

Now for the nitro lacquer. I found nitro at Lowes, they sell a spray type made by Deft. It does not say on the can that it is nitro, however if you look on the brands website you can confirm that it is. Although, I would imagine any kind of clear coating finish would do, I chose nitro because it is known for being thin, and for me thinner is better since there was already poly on it.

You have to start out spraying VERY lightly, like a very, very light "dusting" and letting that DRY about an hour so you do not disturb the decals and cause them to peel up, or crinkle, or such. Again, I got most of this info from various places online and I am thankful for this warning because I had no problems at all. :)

I added enough Nitro so that I could safely add about 2 normal coats without fear (always an hour between coats). I then let this sit and cure for a week.

I then VERY carefully sanded down the nitro. I did this to make a smooth surface on the guitar, so there would be no ridges around the decal, because even though they are thin they still were more raised than the rest of the surface obviously. This basically left barely anything over the decals themselves and brought the rest of the face "up to" the same level.

I then sprayed two more "normal" coats (hour dry time in between) over the face of the guitar so that the decals would be nicely  "buried".

Again, another week long cure.

After that I gave it a good wet sanding, working from 400-800-1000-1200-1500-2000 grits. Then used 3M Finesse It to bring it to a nice glossy shine.

I wish I could get better pictures to really show the glossy shine it has now, as well as how well the decals turned out. They almost look drawn or painted on as you can't see any ridges around them. It's cool since they are in-between layers of finish they almost have a 3D-ish effect as well.

For how time consuming, and how bad my arm still hurts from all that sanding, I think it was still very much worth it. Even though, unfortunately, you can still see those darn cracks underneath! Agh! But at least there is a distraction to keep one from focusing on them. :)
And the guitar actually has a nice "richer" sound to it, I am ECSTATIC that it actually sounds BETTER.

Step 9: Finishing touches.

Then all there was left to do was change out the cheap gummed up Taiwanese machine heads, for an economy Gotoh machine head set.
Adjust the truss rod to fix the bow.
Check action and intonation. (yay for online guides)
Used lemon oil on the fretboard and made it all nice and "healthy" looking again.
And for good measure I added a guitar strap button.

DIY nail art decal..preparazione in casa delle decal da unghia

Materiali:
-Stampante Inkjet
-Software per la manipolazione di immagini (GIMP..free) o photoshop
-Topcoat
-Smalto bianco/trasparente
-Fissativo spray
-Carta decal trasparente
Istruzioni:
1. Con il software di manipolazione immagini regolate la dimensione
dei vostri decori affinchè si adatti alle vostre unghie
2. Stampate su carta comune per accertarvi del risultato
3. Una volta sicure delle dimensioni e della risoluzione stampate su carta decal
4. Dopo la stampa passate il fissativo spray anche una sola mano data per bene,
    occhio alla distanza (ideale25/30cm), non fate colature lavorate in un luogo     aereato e non polveroso.
5. Aspettate almeno un ora,tagliate le decal e lasciate un sottile bordo prima del disegno
6.Ora se volete le unghie con base bianca passatevi lo smalto bianco e lasciate asciugarlo per bene
7. mettete le decal a bagno per 30 secondi o più
8. Prendete le decal dall'acqua e con delicatezza fate scivolare la pellicola decorata dalla carta sottostante all'unghia, può essere utile avere l'unghia bagnata per facilitare il posizionamento.
Tamponate bene la decal, anche con ovatta o cotonfiock non lasciate acqua o bolle d'aria.
9. Bene ora rifinite e coprite la decal con il Top coat


Materials:
- Inkjet printer
- Photo editing software
- Topcoat
- White nail polish
- Clear coat spray (any brand) from your local hardware store
- Clear “water slide” decal paper
Directions:
1. In your photo software, resize your desired image to fit your nail
(I made my images ¼” wide to fit my nail beds)
2. Print on normal paper first to test out the size & resolution
3. Once image is good, print your images on water decal paper
4. When your ink is dry, seal with 2 thin coats of clear coat spray. Let dry
5. Cut out your images carefully and leave as little space as you can between the edge and the image
6. To make the decal stand out, paint your nails white and let dry
7. Dip the decals in water for a few seconds
8. Gently slide the decal off the paper and apply them to a wet nail to easily slide it into position. (You can dab it with tissue to soak up any extra water after the placement is finalized.)
9. Then seal with topcoat!
Decal Ideas:
- friends, family
- Birthdays, graduations (class of ____!)
- Pets
- Sports teams
- Travel destinations
- Favorite cartoons/mascots/characters from TV, movies,etc
- Holidays
- Music groups
- Text
- Basically you can make whatever you want!
General tips:
- I do not recommend creating full nail designs as bigger designs can pucker and won’t lay flat
- If your nail beds curve a lot, narrower designs will fit better and lay flatter
- Be careful when using spray gloss in a can! Do it outside in a ventilated area

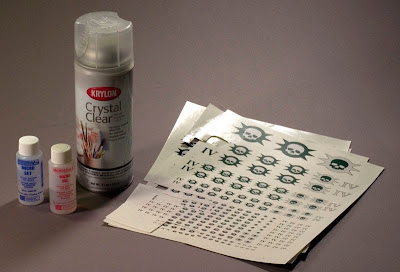
Warhammer decalcomanie fai da te-DIY warhammer decal

Tutorial semplice e pratico su come realizzare le decalcomanie per il proprio esercito.

1 - Comprare la carta decal corretta
Acquistare solo la carta per il tipo di stampante che avete! Potete scegliere di acquistare in carta trasparente o bianca sia per stampanti laser che per stampanti INKJET.(scegli la carta da qui)
2 - Cosa stampo?
Ovviamente dovete avere un foglio in formato grafico da stampare, contenente i simboli e le grafiche del vostro esercito. Se non siete in grado di creare grafica al pC, potete cercare qualcosa online!
.
3 - Stampa del foglio:
Preparate il vostro lavoro grafico su pc.
Dimensionate ed impaginate a vostra preferenza
scegliendo la risoluzione idonea al vostro lavoro.

Fate delle prove se non siete pratici, per l'impaginazione,
con dei fogli comuni e qualità bozza, tanto per vedere
se i margini delle foto \ immagini loghi siano corretti.

Quando siete sicuri stampate sul foglio decal su lato lucido.

Lasciate asciugare qualche minuto i fogli stampati.
Fase 4 - Fissaggio  (obbligatorio x stampa inkjet-opzionale x LASER)
Bene, ora prendete il vostro fissativo protettivo spray (fissativo acrilico sintetico a rapida essicazione-bomboletta spray qualsiasi ferramenta). . Spruzzare l'intera superficie superiore del foglio con vari strati fino ad ottenere una buona mano di protettivo. Spostare con cautela il foglio (senza toccare la superficie superiore) in un luogo sicuro e lasciare asciugare completamente.

Fase 5 - Usare le decalcomanie
Abbiamo quasi finito. Il tuo foglio è pronto e funziona come qualunque decalcomania (anche come quelle GW). È possibile utilizzarlo come qualsiasi altro foglio decal si della GW. Una volta che la vostra decalcomania è nella sua posizione finale  tamponate via l'acqua in eccesso con dell'ovatta leggermente umida.A questo punto come opzione potrete anche rifinire a spruzzo l'oggetto con una nuova mano di trasparente lucido che andrà così a proteggere tutto l'oggetto compresa la decal.